Why Docker?
If you have ever tried building a third party ROS package, you know the time and effort it takes to setup the required dependencies. Often times, the package you are trying to install will be compatible with only specific versions of its dependencies. Say for example you are using a deep learning framework like TensorFlow/PyTorch. These frameworks require specific version of CUDA packages to run correctly. If you already have an incompatible version of CUDA installed, your TensorFlow installation may throw errors. Downgrading/upgrading the CUDA version has its own set of associated problems. On top of this, if you are working on a collaborative project, the version of TensorFlow and CUDA that you have might not be the same as what your colleague is using. This may result in the classic problem of software development: “It works on my machine”.

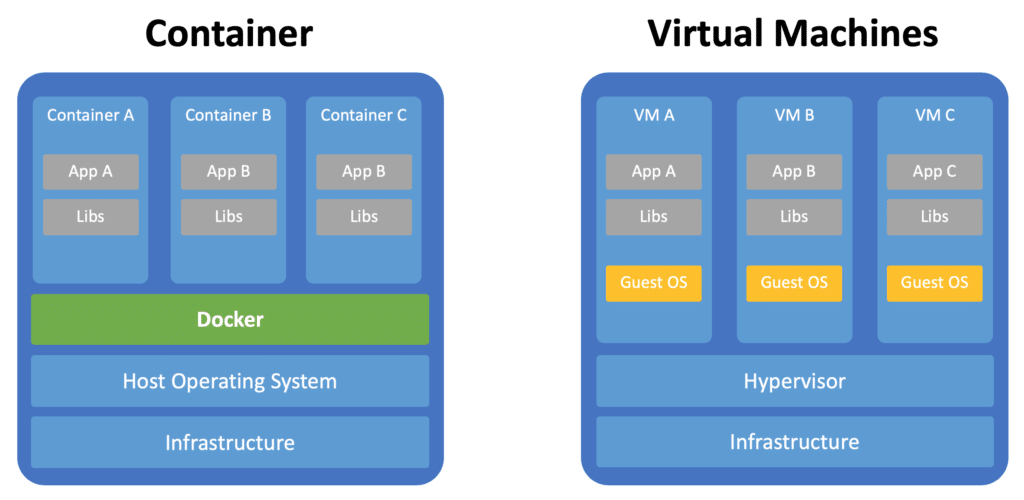
This is where Docker comes in. Docker is like a virtual machine, but smarter. A VM runs an entire OS within an OS, taking up precious computing resources. Docker is much smarter. A Docker VM, called a ‘Container’, only runs a stripped down version of an OS. This bare-bones version of any OS only has the minimum required packages to run whatever task you are trying to accomplish. Docker containers also utilize the full memory and processing power of your system, making them much faster than traditional VMs. The benefits of using Docker containers for software development are endless and require their own separate article to do proper justice. For now, I will explain how using Docker simplifies our ROS2 installation.
Every ROS version requires a specific Ubuntu version to run. For example, ROS Melodic is made for Ubuntu 18.04. Installing Melodic on Ubuntu 20.04 will undoubtedly cause problems. The current Long-Term-Supported (LTS) version of ROS2 is called Foxy Fitzroy. ROS2 Foxy is made for Ubuntu 20.04. So for installing ROS2 on your system, you will need Ubuntu 20.04. But as Melodic is the current LTS for ROS1, there is a high chance that you, like me, are using Ubuntu 18.04. Even if you are using Ubuntu 20.04, there is a chance that you might have ROS1 Noetic installed on your system. In all these cases, installing ROS2 will cause numerous problems, be it due to incompatible OS version, or simply due to conflicts between ROS1 and ROS2 packages. To avoid this, we can install and run ROS2 in an Ubuntu 20.04 Docker container.
Docker Containers, Images and Dockerfiles
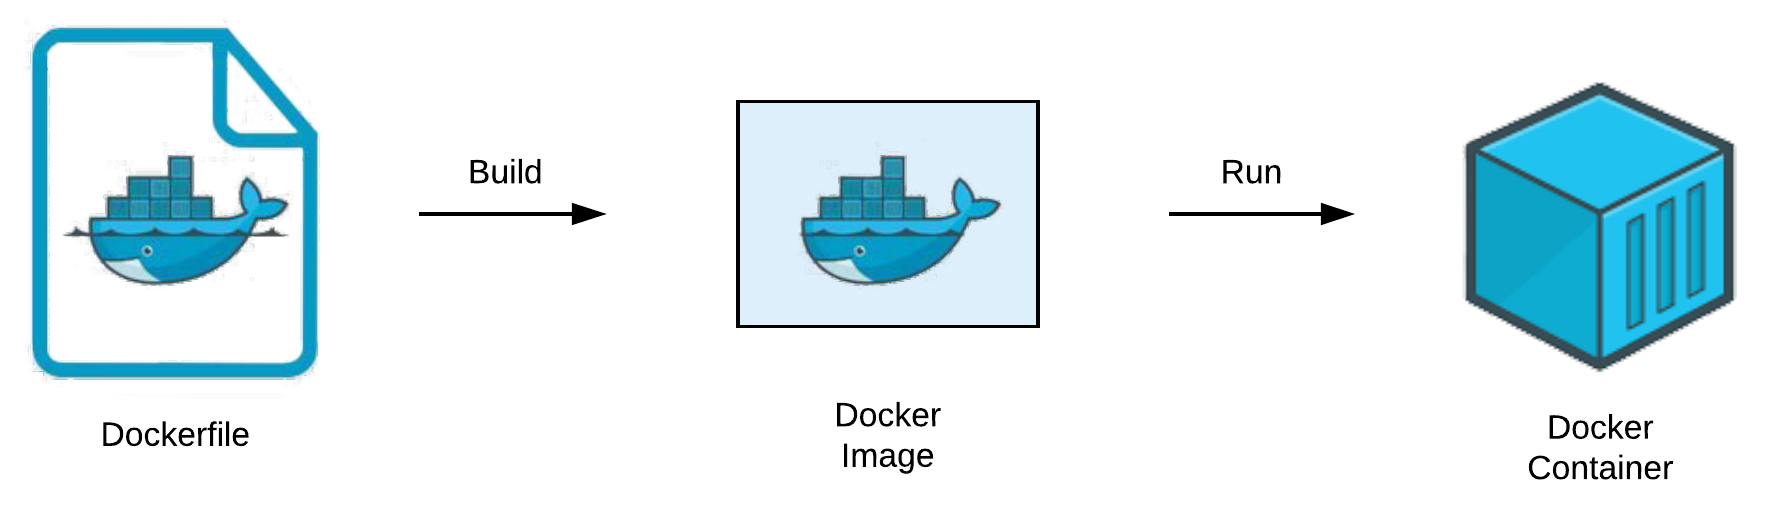
The simplest way to understand Containers and Images is via an Object Oriented Programing (OOP) analogy. A Docker image is like a class and a Docker Container is an object (or instantiation) of the image. A Docker Image contains everything needed to run a container: code, libraries, environment variables, configuration files, etc. It serves as a blueprint which can be used to create an instance, ie, a Docker Container. Once a Docker Container is created, you can tinker with it as much as you like, and it won’t affect the image from which it was built.
You can find prebuilt Docker Images for many different applications on the DockerHub1, which uses a GitHub like cloud solution where you can pull images to your local computer. These prebuilt images have relevant libraries, environment variables, etc. already setup so you can simply create a Container from the Image and get started on your work.
If you can’t find a suitable image for your use case on DockerHub, you can create your own Docker Image using a Dockerfile. A Dockerfile is a set of instructions to build a Docker Image. You can learn more about the syntax and standard practices of writing a Dockerfile from the documentation2. For the purposes of this guide, I will explain the commands that I used as we go.
The Open Source Robotics Foundation(OSRF) has hosted ROS Docker Images on the DockerHub. While having the knowledge of Dockerfiles and building your own images is helpful, if you are in a hurry, you can pull the ROS2 image from DockerHub here.
Building the ROS2 Image
ROS2 Foxy Fitzroy is made to run on Ubuntu 20.04. So in the first line, we download the Ubuntu 20.04 Docker Image:
FROM ubuntu:20.04
If you don’t have the image locally, Docker is smart enough to pull it from the official Ubuntu Images on DockerHub.
The instructions that follow are for the ROS2 installation on top of Ubuntu 20.04. My approach to this was modifying the existing set of instructions given in the ROS2 documentation3.
Set locale
This can be done easily in Docker Images using:
ENV LANG C.UTF-8
ENV LC_ALL C.UTF-8
The ENV command is used, as the name suggests, to set the environment variables.
Setup Sources
Next, we need to setup the sources so that the system knows where to look for ROS2 packages. The RUN command essentially lets us execute terminal commands.
RUN apt update && apt install -y curl gnupg2 lsb-release
RUN curl -sSL https://raw.githubusercontent.com/ros/rosdistro/master/ros.key  -o /usr/share/keyrings/ros-archive-keyring.gpg
Notice that there is no sudo before apt. This is because by default, you are already logged in as root in docker. The -y was added to bypass the prompt by apt, which asks the user if they want to continue the installation or not.
RUN echo "deb [arch=$(dpkg --print-architecture) signed-by=/usr/share/keyrings/ros-archive-keyring.gpg] http://packages.ros.org/ros2/ubuntu $(lsb_release -cs) main" | tee /etc/apt/sources.list.d/ros2.list > /dev/null
Install ROS2 packages
After updating the existing packages, we are ready to install ROS2 foxy. This is as simple as:
RUN apt update
RUN DEBIAN_FRONTEND=noninteractive apt install -y ros-foxy-desktop
The ROS installation asks for configuration prompts in between the installation. Especially for selecting the timezone and keyboard language. Using DEBIAN_FRONTEND=noninteractive allows to bypass this step by letting the installer pick the defaults. And -y as before automatically switches answers to yes when prompted.
Setting up a workspace
While the above steps are enough to build a Docker Image with ROS2, it’s nice to add the following lines for convenience. The first thing that you might end up doing after a ROS installation is setting up a workspace. While this is a fairly easy task, it’s always nice to automate even that, so you can get started right away.
WORKDIR /root/dev_ws/src
RUN git clone https://github.com/ros/ros_tutorials.git -b foxy-devel
WORKDIR /root/dev_ws
The above lines make a folder called dev_ws which will serve as the colcon workspace. And also clone the ROS2 tutorials for beginners. The WORKDIR command, as the name suggests, changes the working directory of the terminal that the Docker Container is running in. Docker is smart enough that if such a directory doesn’t exist, it will make one without prompting the user.
Finally, we install rosdep and colcon. Both are essential packages for ROS2. Rosdep helps resolves errors associated with missing dependencies. Colcon is the next iteration of catkin_make and other tools that were used for building packages in ROS1.
RUN apt-get install python3-rosdep -y
RUN rosdep init
RUN rosdep update
RUN rosdep install -i --from-path src --rosdistro foxy -y
RUN apt install python3-colcon-common-extensions -y
Entrypoint for ROS2
For using ROS commands in any new terminal, we need to source the setup.bash file. To avoid the hassle of sourcing the file in every terminal, we normally add a script to the .bashrc file. A similar thing can be done for Docker Containers.
COPY ros2_entrypoint.sh /root/.
ENTRYPOINT ["/root/ros2_entrypoint.sh"]
CMD ["bash"]
The COPY command copies the entrypoint shell script that I wrote to the root of the Docker Container. This script will source the setup.bash file. The command ENTRYPOINT allows us to set the script which will run each time a container is started. Finally the CMD command is used to set bash as the default executable when the container is first started.
Conclusion
This brings us to the end of this little guide. While they might seem tricky to setup, using Docker Containers for software development saves a lot of hassle in the longer run. It gives the developer a peace of mind, knowing that even if he/she messes up the OS, it won’t damage their own system, as the OS is running inside a Container. I hope this guide helped you understand and appreciate how simple it is to setup your own Docker Image/Container. You can check out the code for my Dockerfile. The Open Source Robotics Foundation also has their own ROS Docker Images4, which are regularly updated on the DockerHub. If you want to save some time and are content with the default dependencies that the OSRF Docker Images have, you can always pull the image of your choice from DockerHub.
Image Sources:
- It works on my computer comic - Jeff Lofvers - Don’t Hit Save
- Docker Container & Traditional VM - Sebastian Eschweiler - Coding The Smart Way
- Dockerfile, Image and Container - Rocky Chen - Medium